The theme has built-in capabilities for creating sliders without third-party plugins.
How to create a slider
A slider can be created using the carousel component, which sequentialy shows the separate slides with custom content.
The most common case is the full-width slider. Each slide has a section with the container, adaptive grid and columns. You need to create each slide as a regular content block using WPBakery Page Builder with maximum flexibility.
How to create slides
Before creating a sliders, enable the page builder for the template_post post type
How to enable page builder for custom post types
You can import pre-made slides from demo data or create them manually.
- Navigate to KSF SmartKit > Content blocks tab in your WordPress admin sidebar and click Add new content block.
- Enter the slide title (e.g. “Slide 1”) into the title field.
- Add a content to your slide using WPBakery Page Builder (see more on how to use the page builder here).
- Click on the Publish button.
Building a slide layout and content
- Click Add Element button in the WPBakery Page Builder frame.
- Search for Section in the add element pop-up window and click on it to add it to the slide. When you add Section element, the Row element is added automatically.
- Choose the row layout by clicking on the Three horizontal lines icon in the left top corner of the Row element. Common layout is one column less than 100%. The width of the column on the desktop can be 1/2 or 3/4.
- Click on the Pencil icon in the right top corner of Section element to show the Section’s settings window.
Go to Background tab and adjust image background for the slide. Add an overlay if necessary. - Click on the Pencil icon in the right top corner of Row element to show the Row’s settings window.
Choose Without paddings in Vertical paddings dropdown.
Choose Center in Columns vertical placement dropdown.
Enable the row Minimum height and set its value. For example, to100vh. - Click on the + button inside the column and add the content elements into the column. It can be Headers, Text blocks, Buttons and any other components.
Create a few more slides the same way.
For correct display, all slides must have the same minimum height and vertical padding values.
How to show the full-width slider
Note! If you want to get a full-width slider, do not insert Carousel into Section. Otherwise, the section component may limit the slider width.
- Navigate to the editing screen, where you want to show the slider.
- Click Add Element button in the WPBakery Page Builder frame.
- Search for Row in the add element pop-up window and click on it to add it to the page.
- Click on the + button in the row’s column.
- Search for Carousel in the add element pop-up window and click on it to add it to the page.
- Check Show navigation buttons option in settings panel and go to Buttons tab. Choose Inset buttons position for the full-screen slider.
- Adjust loop options and other options if necessary.
- Save changes. A carousel component with two carousel items appears.
- If you want to add more slides, click the + button below the last item.
- Click on the + button inside the carousel item component.
- Search for Content block in the add element pop-up window and click on it to add it into carousel item.
- In the Content block popup window, choose the slide name (“Slide 1”) from the list.
- Click on the Save changes button.
- Add content blocks to each other carousel item the same way.
Now the full screen slider is ready.
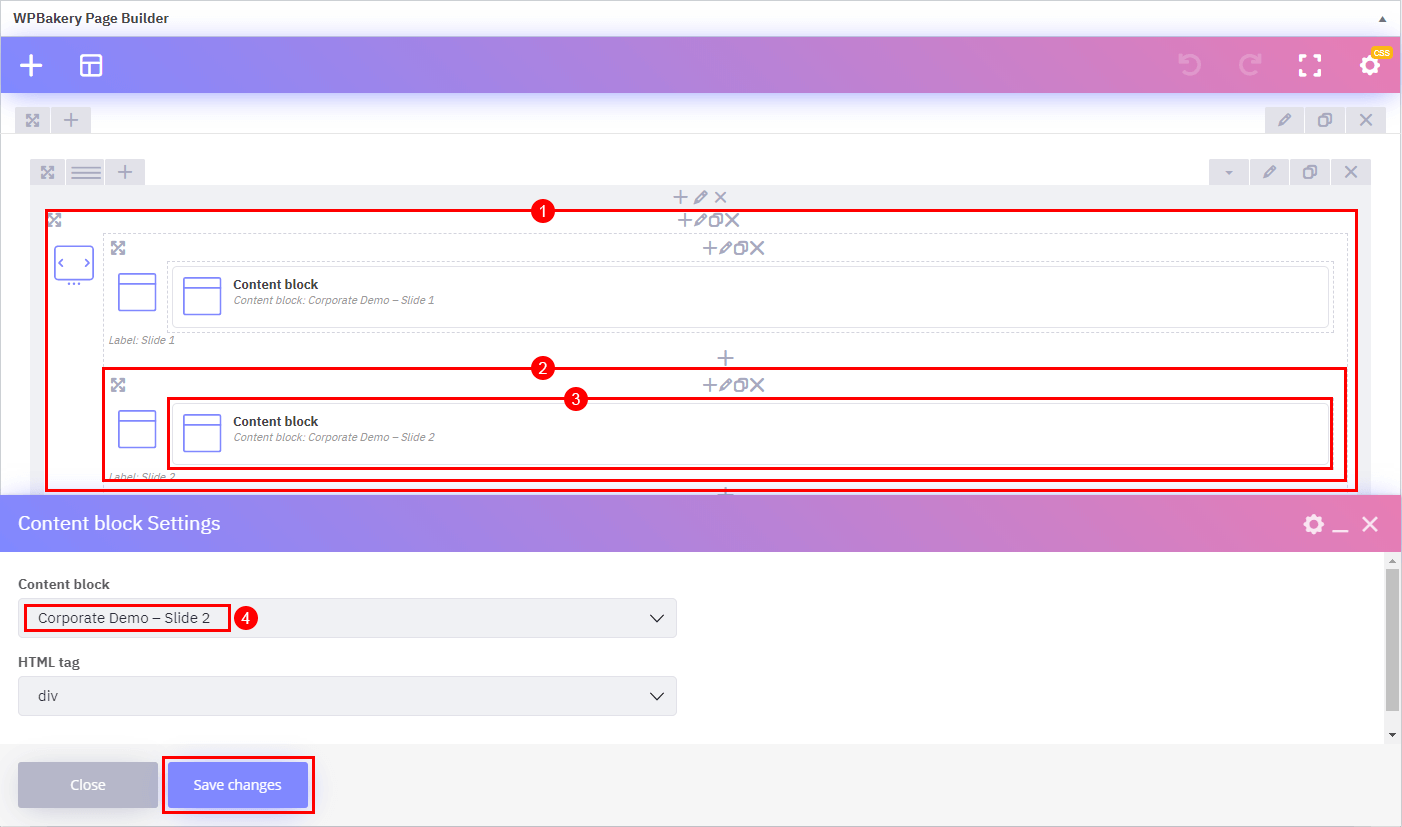
1. Carousel component
2. Carousel item (slide) component
3. Content block component
4. Content block select dropdown